netTerrain 9.5 Import / Export Guide

Document Code. GN_D_nT9-06 Last revision: 08/10/2022
© 2022 Graphical Networks LLC. All rights reserved.
Graphical Networks and netTerrain are registered trademarks of Graphical Networks LLC. Other product names mentioned in this manual may be trademarks or registered trademarks of their respective companies and are hereby acknowledged and stuff.
If rash, irritation, redness, or swelling develops, discontinue reading. Safety goggles may be required during use. Do not eat this guide. This disclaimer is not intended as legal advice. For that, better call Saul.
Image: Cliffs of Moher, Ireland.
Graphical Networks LLC
Telephone: + 1 - 240 - 912 - 6223
Fax: +1- 240 - 912 - 6339 (anybody still uses these?)
1 About This Guide
This document is divided into the following chapters:
-
Chapter 1, About This Guide
-
Chapter 2, PDF, Visio, PowerPoint and static methods
-
Chapter 3, netViz Import
-
Chapter 4, Excel Import
-
Chapter 5, KML and KMZ Files
1.1 Who should use it
This guide is intended for netTerrain administrators tasked with the configuration and set up of various bulk import and export mechanisms.
netTerrain does provide many other import and export mechanisms, including third-party integrations, discovery, database imports and exports as well as API integrations. Those mechanisms are usually better suited for continuous processes as opposed to bulk or one-time imports. They are achieved via the Integration Toolkit (ITK), the collector and the RESTful/SOAP API. None of these continuous mechanisms are covered in this Mickey Mouse guide, for those other methods consult one of the other guides for grown-ups:
- ITK guide
- Database description and scripting guide
- API programming guide.
1.2 Assumptions
This guide assumes that the administrator has knowledge of the following:
-
SQL Server administration, including login/security management, backup and restore procedures
-
Knowledge of IIS Management, including creation of virtual directories/applications
-
Overall knowledge of server administration procedures (installing, uninstalling and managing application settings)
2 PDF, Visio, static methods and PowerPoint
This chapter goes over the following bulk import and export processes:
- PDF exports
- Visio exports and imports
- PowerPoint exports
- Static methods (HTML and PNG)
Since some of the export mechanisms can be executed from the server as well as from the client, whenever applicable, we will cover both.
Attention!
The import and export options will only be available if a netTerrain administrator enabled them in the admin console. Please check the netTerrain Administrator guide to see how that is done.
2.1 Client-side PDF export
One of the easiest ways to export diagrams from netTerrain is by using the PDF export option. The PDF option is available from the Import & Export ribbon in netTerrain. If the PDF icon is not present, then it was not enabled by the administrator (see netTerrain admin guide on how to enable the feature). There is no additional software that needs to be installed for the PDF export option to work.
To use the PDF export, follow these steps:
1) Press the PDF icon available from the Import & Export ribbon:

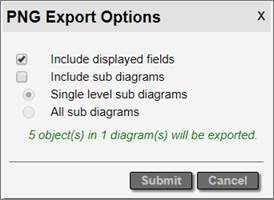
2) A PDF Export options dialog appears
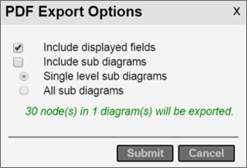
The Include displayed field option will preserve any displayed fields present in the diagrams when exported. The include sub diagrams provides two options:
a. Single Level sub diagrams : will export the current diagram and one level below
b. All sub diagrams: will export the current diagram and all diagrams below
3) Press ‘Submit’
Attention!
This can be a time-consuming process when several diagrams are part of the export. When performing a large export, it may be best to do this during a time of the day when there is less user activity. For instance, when they are all sleeping or at the water cooler chatting non-stop.
Notice that before hitting submit, netTerrain will provide you with a count of nodes to be exported so that you can decide whether a reduction in number of diagrams to export is in order.
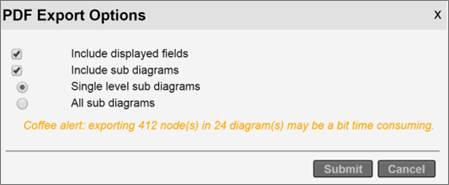
Message indicating the number of nodes and diagrams to export
2.2 Exporting netTerrain diagrams to Visio and PowerPoint
netTerrain gives the users the ability export diagrams to other graphical tools:
- HTML, which comes in handy for embedding diagrams on another website or perhaps as part of a frame inside another application
- PNG, which is useful for easy distribution of individual diagrams
- PowerPoint, for that presentation that you need along with your TPS report
- Visio, if you are a masochist, or perhaps for that curmudgeon that also likes to heat up leftover fish in the office
2.2.1 Server-side vs client-side exports
Visio and PowerPoint export rendering from the application server require those applications to be installed on the server. Often installing these applications on the application server is not possible. netTerrain provides an alternative export mechanism where the client renders the Visio or PowerPoint exports, instead of the server.
To enable server-side exports, the administrator can enable that setting from the admin console:
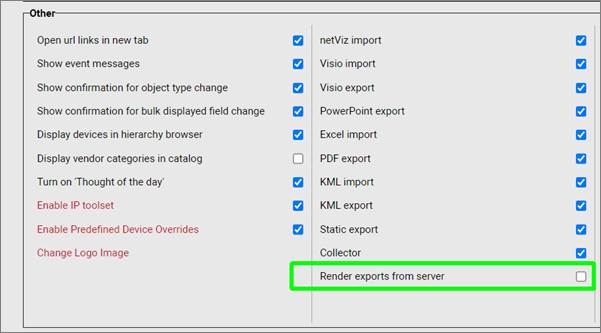
However, when the server-side exports are disabled, users must download the export utility to take advantage of PowerPoint and Visio exports.
To download the Exporter tool, simply go to Tools->Utilities and click on ‘Exporter Tool’.
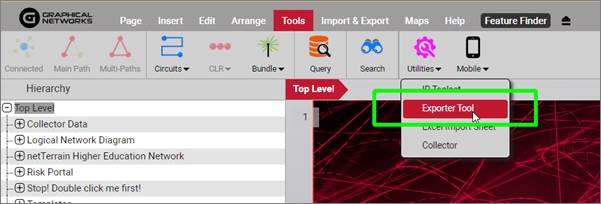
Exporter tool to export to Visio and PowerPoint client-side
2.2.2 Starting the export process
To start the export process to PowerPoint or Visio click on one of the export buttons on the Import & Export ribbon.

Visio and PowerPoint export options
2.2.3 Visio export options
After clicking on the Visio export button, a dialog showing export options will be displayed, as shown below in the Visio export example:
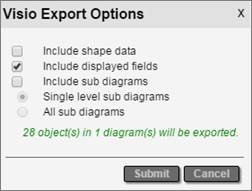
Visio export options
The following options are available when exporting Visio files:
- Include Shape Data: exported objects from diagrams will include all field data in the exported Visio diagrams.
- Include displayed fields, which means that any displayed data in the diagram will also be in the Visio exports.
-
Include sub diagrams, which will export child diagrams to individual Visio sheets depending on the sub diagram options that are checked. These are:
-
Single level sub diagram, which exports the immediate level below
- All sub diagrams exports, which, well, you guessed it, exports everything
Note that the “all sub diagrams” option can take a very long time to process and is not recommended for large sets of diagrams. If your boss really must see the entire collection of diagrams then get ready for a really long coffee break (or better yet, give him access to netTerrain, it’s a much better app anyways).
If the file is rendered on the server the file will be made available for download by a server process.
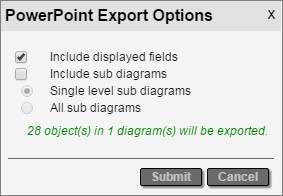
2.2.4 PowerPoint export options
The PowerPoint export options are like Visio’s, except that no shape data option is present because PowerPoint does not support that feature.

PowerPoint export dialog
The following are the options for ruining, I mean, exporting your lovely netTerrain diagrams to PowerPoint:
- Include displayed fields, which means that any displayed data in the diagram will also be displayed in the PowerPoint exported slides.
-
Include sub diagrams, which will export child diagrams to individual PowerPoint slides depending on the sub diagram options that are checked. These are:
-
Single level sub diagram, which exports the immediate level below
- All sub diagrams exports, which sets you up for a long water cooler break
Also notice how netTerrain shows the number of nodes and diagrams to be exported. Just as with PDF, use this feature to determine if maybe a smaller portion needs to be exported.
2.2.5 Exporting and fetching the files
After clicking on ‘Submit’, the Visio or PowerPoint export process commences.
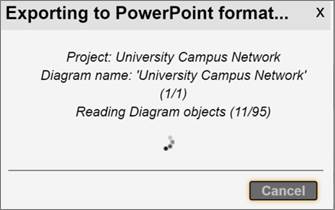
An example of a PowerPoint export being processed
If the export is enabled on the client side, an .ntd extension file indicates that the process is ready for local rendering.

PowerPoint export file downloaded for local rendering
After you double click the .ntd file extension the netTerrain toolset will begin the rendering process.
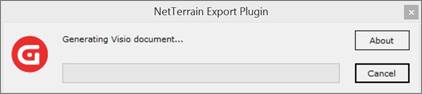
Visio export file being rendered locally
When the process is complete the file should automatically open.
2.3 Server-side Visio Import and Export
For the server-side Visio import to work properly, Visio 2010 or 2013 needs to be installed on the netTerrain application server. If you only need to export diagrams and do not want to install Visio on the server, you can render diagrams from a local installation of Visio. See the section entitled “Visio and PowerPoint Helper App”.
2.3.1 Setting it up
Follow these steps to configure the Visio import in netTerrain:
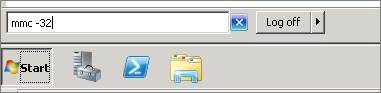
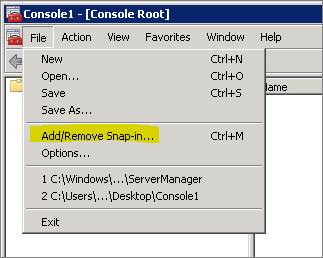
1. On the application server run the 32-bit version of the Microsoft MMC to change the Visio settings. If Visio is 64-bit, then use MMC, only without the -32.
2. The MMC console should start up.
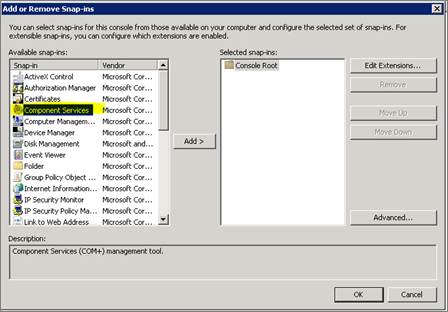
3. Select Add/Remove Snap In.

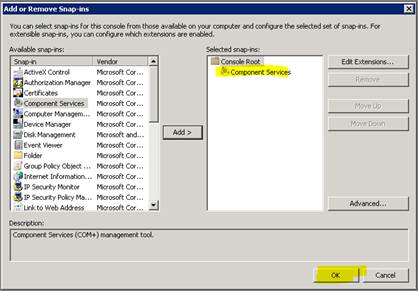
4. Select Component services, press “Add” and then press OK.

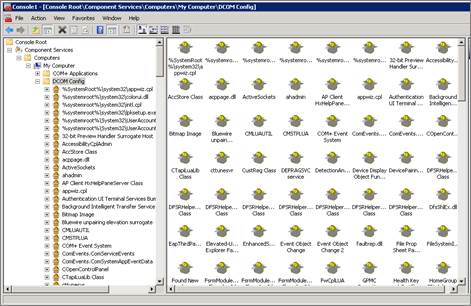
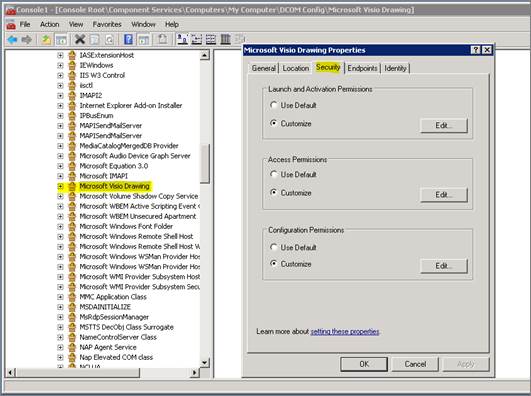
5. Open “DCOM config” and then scroll down to “Microsoft Visio Drawing”.
6. Right click on “Microsoft Visio Drawing” and choose properties.
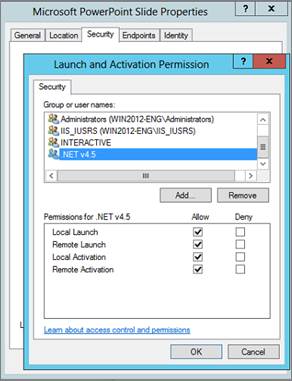
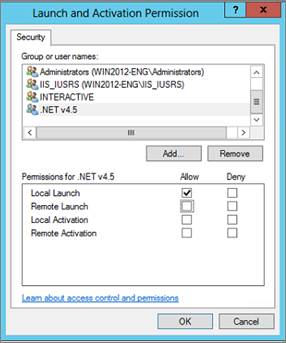
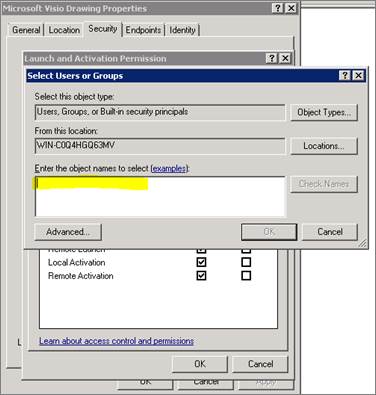
7. Click on the Security Tab and under "Launch and Activation Permissions" click "Customize", and then click "Edit".
8. Add the user "IIS APPPOOL[AppPoolName]". This account will not be listed or be searchable. You must type it in as follows:
IIS AppPool\ASP.NET v4.5.
Attention!
Make sure you type in the appropriate application pool name. For instance, if you setup an application pool called “netTerrain” then you must use this application pool name and not the default application (such as ASP.NET v4.5).
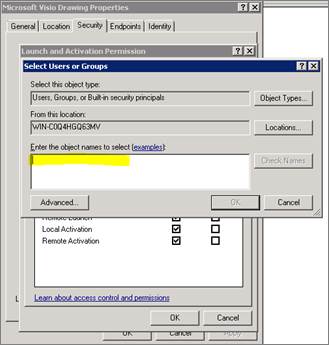
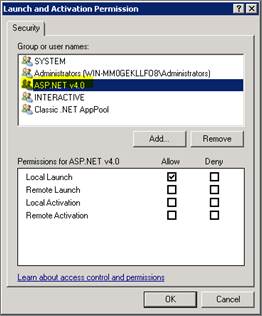
9. Press ‘OK’. If it was typed in correctly, the name will be accepted, and the permissions can be configured. Additional permissions may be needed, but this could depend on your environment. If needed, enable all permissions.
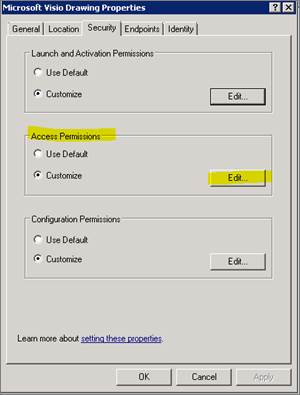
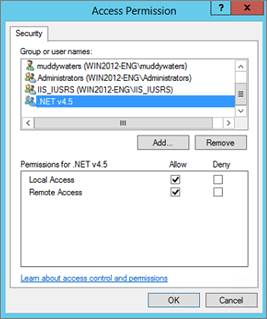
10. Follow the same steps for "Access Permissions".
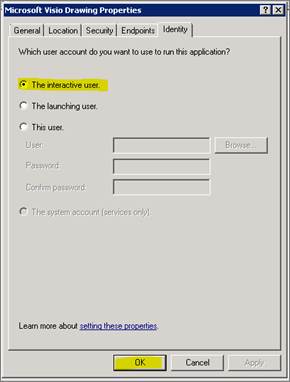
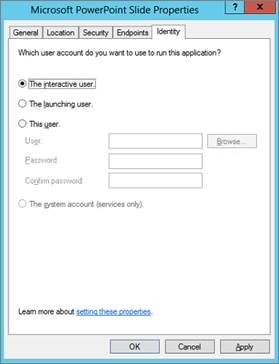
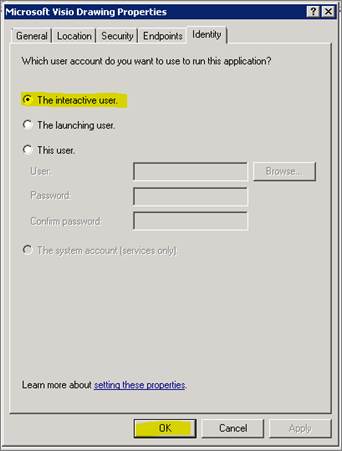
11. Select the Identity Tab and then check "The interactive user". Then press OK. You can now shut down the console.
2.3.2 Other settings and components
The following settings and components should be noted:
1) Log files: In case of an import problem, you can review the Visio import log files from the “uploads” folder.
2) Large files: To handle large Visio files (greater than 10MB) you need to enable this property in IIS and update the web.config file section shown below:
<system.webServer>
    <security>
        <requestFiltering>
        <requestLimits maxAllowedContentLength="524288000"/></requestFiltering>
    </security>
</system.webServer>
2.3.3 Using the Visio importer
Once the Visio importer has been configured you can import a project using the netTerrain web interface. After logging in you should see a “Visio” icon in the Import & Export ribbon.
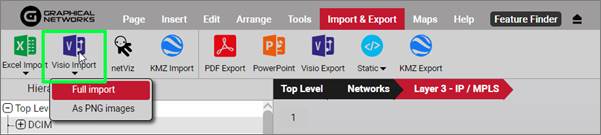
Visio import button
There are two ways to import a Visio file: as a static searchable image or as a full project.
Static Visio imports simply convert the contents of each Visio sheet into a static image (no selectable nodes and links). As a bonus, all the attributes for each Visio object are indexed in netTerrain so that you can search for them. However, netTerrain will not pinpoint to the object that matches a search, since it is simply part of a static image, but at least it will take you to the image that contains it.
Full project imports are a lot more elaborate since they do convert the Visio objects into netTerrain nodes and links.
To start an import simply click the on the corresponding Visio import option and you should get a popup prompting you to upload a drawing.
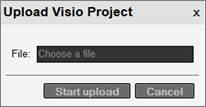
Uploading a Visio file
The drawings will be uploaded into the diagram you were in when you pressed the import button, under a top-level Visio icon that bears the name of the Visio project.
Because Visio drawings will not generate smart devices or racks in netTerrain (that concept does not exist in Visio), it is probably better to upload Visio diagrams onto a netTerrain diagram that holds (or will hold) logical data. Better yet, don’t use Visio, it’s not good for your health.
netTerrain currently only supports .vsd Visio file formats. If the file is larger than 10MB, then IIS may conspire on you and time out. Make sure you configure the settings in the web.config file to allow for large file uploads.
2.3.3.1 Using Visio stencils in the netTerrain catalog
Users can also import Visio stencils from netTerrain directly. After logging into the project, you should see a “Visio” icon under the Import & Export ribbon. Simply click the icon and you should get a popup to upload a stencil file in .vss format. After the upload completes the stencils will be turned into netTerrain objects in the catalog “nodes” section. Any fields associated with the stencils will also be converted into netTerrain fields.
2.4 Server-side PowerPoint Export set up
PowerPoint exports will be visible for end users when a netTerrain administrator enables them in the admin console. For the server-side PowerPoint export to work properly, PowerPoint needs to be installed on the netTerrain application server.
As mentioned before, if you do not want to install PowerPoint on the server you can render diagrams from the local netTerrain user.
2.4.1 Setting up the server side PowerPoint export capability
Follow these steps to configure the PowerPoint export in netTerrain:
1. Log into netTerrain as a user with admin permissions. Go into the admin console and enable the PowerPoint export.
2. On the application server run the 32-bit version of the Microsoft MMC to change the PowerPoint settings. If PowerPoint is installed on a 64-bit system use ‘mmc’ (only without the -32).

3. The MMC console should start up.

4. Select Add/Remove Snap In.

5. Select Component services, press “Add” and then press OK.


6. Open “DCOM config” and then scroll down to “Microsoft PowerPoint Slide”.
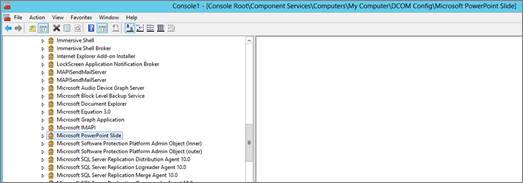
7. Right click on “Microsoft PowerPoint Slide” and choose properties.
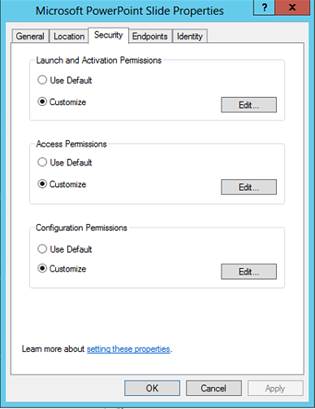
8. Click on the Security Tab. Under "Launch and Activation Permissions" click "Customize", and then click "Edit".
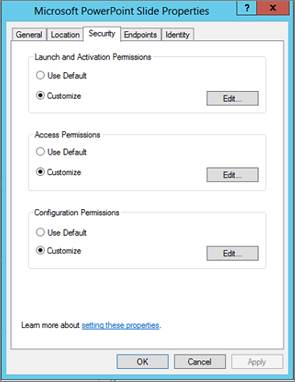
9. Add the user "IIS APPPOOL[AppPoolName]". This account will not be listed or searchable. You must type it in as follows:
IIS AppPool\ASP.NET v4. (or .NET 4.5).
Attention!
Make sure you type in the appropriate application pool name. For instance, if you setup an application pool called “netTerrain” then you must use this application pool name and not the default application pool for instance ASP.NET v4.0.
10. Press OK. If it was typed in correctly, the name will be accepted, and the permissions can be configured. Additional permissions may be needed, but this could depend on your environment. If needed, enable all permissions.
11. Follow the same steps for "Access Permissions".
12. Select the Identity Tab and then check "The interactive user". Press OK and shut down the console.
2.4.2 Using the Server-side PowerPoint export
Once the PowerPoint application has been configured you can export a project using the netTerrain web interface. After logging in go to a diagram you would like to export and simply click on the PowerPoint export button. You should get a popup dialog to export the drawing.

PowerPoint export button
From here on the process is quite the same as with a client-side export.
PowerPoint export dialog
As explained previously in the client-side export feature, the following are the options for exporting your lovely netTerrain diagrams to PowerPoint:
- Include displayed fields, which means that any displayed data in the diagram will also be displayed in the PowerPoint exported slides.
-
Include sub diagrams, which will export child diagrams to individual PowerPoint slides depending on the sub diagram options that are checked. These are:
-
Single level sub diagram, which exports the immediate level below
- All sub diagrams
Also notice how netTerrain shows the number of nodes and diagrams to be exported. Just as with PDF, use this feature to determine if maybe a smaller portion needs to be exported.
2.5 Static exports: HTML and PNG
Sometimes you may need to create a static output for a netTerrain diagram that does not require any specific application to run. For that purpose, we introduced HTML and PNG exports as a mechanism to one or multi diagrams to a format that can be opened with a browser or an image viewer. An additional advantage of these methods is that it does not require any specific set up on the netTerrain server.
2.5.1 Exporting to static HTML
netTerrain diagrams are already in HTML5 format, so why this export option? Native netTerrain diagrams may be HTML, but you need to be connected to the netTerrain server to view them. Sometimes you may have a user that needs to look at a diagram without being connected to netTerrain. This is what this export feature is for.
To start the export process to HTML, click on the ‘Static’ button on the Import & Export toolbar and select the ‘Export as HTML package’ option.
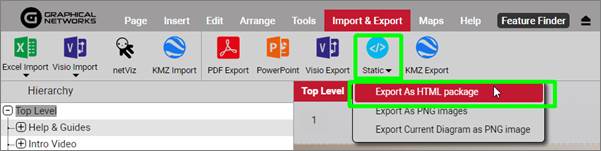
HTML package export
2.5.1.1 HTML export options
After clicking on the HTML export sub menu, a dialog showing export options will be displayed, as shown below:
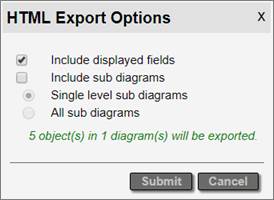
HTML export options
The following options are available when exporting to an HTML package:
- Include displayed fields, which means that any displayed data in the diagram will also be in the exported HTML diagrams.
-
Include sub diagrams, which will export child diagrams to individual HTML pages (hence the name HTML package) depending on the sub diagram options that are checked. These are:
-
Single level sub diagram, which exports the immediate level below
- All sub diagrams exports, which, well, you guessed it, exports everything
Note that the “all sub diagrams” option can take a very long time to process and is not recommended for large sets of diagrams. If your boss really must see the entire collection of diagrams, then get ready for a long coffee break.
2.5.2 Exporting to PNG
To start the export process to PNG, click on the ‘Static’ button on the Import & Export toolbar and select one of the PNG export options.
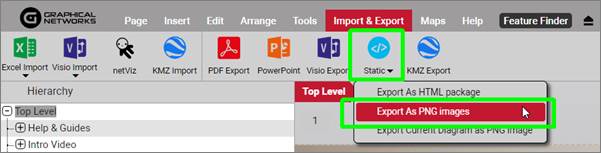
HTML package export
2.5.2.1 PNG export options
The first option of the highlighted sub menus above can export multiple diagrams in PNG format:
PNG package export options
The following options are available when exporting to a PNG package:
- Include displayed fields, which means that any displayed data in the diagram will also be in the exported PNG diagrams.
-
Include sub diagrams, which will export child diagrams to individual PNG files. These are:
-
Single level sub diagram, which exports the immediate level below
- All sub diagrams exports, which, well, you guessed it, exports everything
The second option of the highlighted sub menus in the Static export button exports the current diagram only.
3 netViz Import
This chapter explains the process to set up netViz imports in netTerrain. For the netViz import to work properly, netViz 7.5 needs to be installed on the netTerrain application server.
Before starting the netViz import set up, make sure you place the file called nvbashlp.dll (usually located in C:\Program Files (x86)\Graphical Networks\netTerrain5) in the netViz program folder:
3.1 Modes of operation
The netViz importer can run in two modes: manual or automatic. No, manual does not mean that you must manually create everything in netTerrain again; it simply means that netTerrain will not automatically fetch the data from the netViz .net file; instead you must prepare the import data beforehand.
The manual import involves:
1) Opening the netViz project from the netViz application.
2) Running a netViz basic script from the embedded basic editor inside the netViz program.
3) Taking the xml output generated by the script for a netTerrain import.
This process is easier than it sounds, and we recommend following it if you only have to import a few projects. The automatic import process is easier for end users but setting it up could be somewhat tricky. As a simple rule of thumb, if you have more than 10 projects, try to set up netViz on the app server to run in automatic mode, otherwise import netViz projects in manual mode and skip the next section.
3.2 Setting up the automatic import
If you want to run the import in automatic mode, then you need to set up certain parameters on the netTerrain application server. Why is that? Because netTerrain is a web-based client server application and Microsoft security (for very good and obvious reasons) is quite iffy about letting a web app in IIS take control of a desktop executable.
The convenience of the automatic import lies in the fact that end users can import netViz projects directly from the netTerrain browser by uploading them with the click of a button. The automatic import is convenient when you have many netViz projects to import (e.g.: more than 10).
Note that for netViz projects larger than 30MB you may need to change your IIS settings for the automatic import to work, or you may have to use the manual mode.
Follow these steps to configure the netViz import in netTerrain:
1) On the application server run the 32-bit version of the Microsoft MMC to change the netViz settings.

2) Make sure the MMC console starts up.
3) Select Add/Remove Snap In.
4) Select Component services, press “Add” and then press OK.
5) Open “DCOM config” and then scroll down to “netViz”.
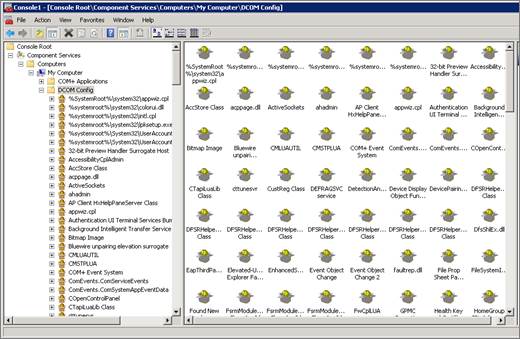
6) Right click on “netViz” and choose properties.
7) Click on the Security Tab: Under "Launch and Activation Permissions", click "Customize", and then click "Edit".
8) Add the user "IIS APPPOOL[AppPoolName]". This account will not be listed or searchable. You must type it in as follows:
Attention!
Make sure you type in the appropriate application pool name. For instance, if you setup an application pool called “netTerrain” then you must use this application pool name and not the default application pool for instance ASP.NET v4.0.
9) Press OK. If the user was typed in correctly the name will be accepted and the permissions can be configured. Additional permissions may be needed, which depends on your environment. If needed, enable all features.
10) Follow the same steps for the "Access Permissions" part.

11) Select the Identity Tab and then check "The interactive user". After pressing OK, you can close the console.
Next, we will review other settings and components to review before importing your netViz data.
3.3 Other settings and components
The following settings and components should be noted:
1) Log files: In case of an import problem, you can review the netViz import log files from the “uploads” folder.
2) Large files: To handle large netViz files (greater than 10MB) you need to enable this property in IIS and update the web.config file section:
<system.webServer>
    <security>
        <requestFiltering>
            <requestLimits maxAllowedContentLength="524288000"/>
        </requestFiltering>
     </security>
</system.webServer>
3.4 Pre-import checklist
Before you start the netViz importer, review this checklist for an optimal process:
1) Back up your netViz project.
2) Print templates: remove print templates and composite views (we cannot import these due to netViz export limitations).
3) Unused types: delete any catalog types that are not used (unless you want to import the unused catalog objects). To do this in netViz:
a) Go to file/catalog/delete types
b) Then choose the option to delete all unused. Do this for node and link types.
4) Repeated type names: combine any nodes or links that have the same name or change the name of these nodes (if you do not change redundant names then some of the nodes and links will be dropped). You can use replace type in netViz, if needed.
5) Field naming: hit F3 to edit the internal catalog to check all node and link fields for repeated names. All field names must be unique for each node and link type. Also, if any node or link field is called "name”, “id” or “type", please rename them since these are netTerrain reserved field names.
6) netViz “blue” field: the field that has the unique name information should be moved to the first position for the types in the catalog. This is usually the blue or green field in netViz. This field will then be mapped with the name field in netTerrain.
7) Run a save and compact on the project.
8) Import the netViz project as described below
3.5 Using the netViz importer manual process
Follow these steps to run the netViz import process in manual mode:
1) Open the basic script called “NVEXPORTscript.bas” located in the C:\Program Files (x86)\Graphical Networks\netTerrain\Utilities folder using notepad and change the output folder path value.
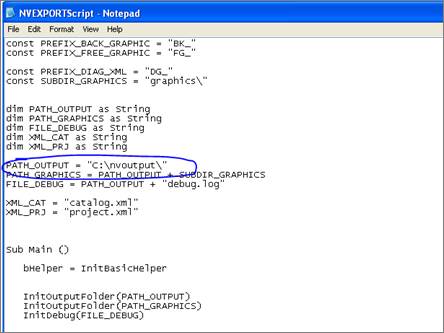
2) Create the output path folder in this instance called C:\nvoutput.
3) Start netViz and open the project that will be converted.
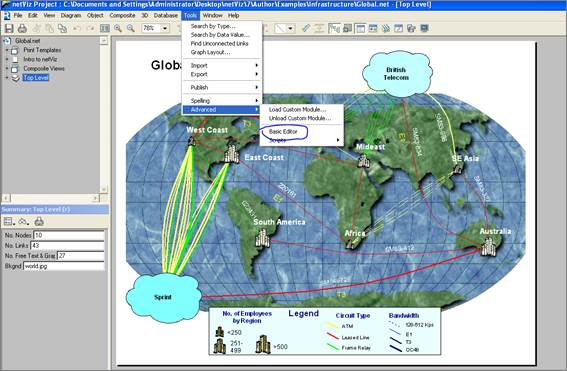
4) Open the Basic Editor feature in netViz.
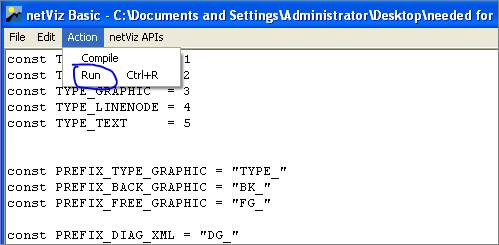
5) Load the “NVEXPORTscript.bas” module.
6) Press ‘run’.
7) When it is completed you should see this message:
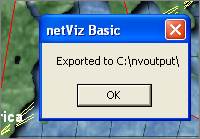
8) ZIP the folder called “nvoutput” (the folder you created on the C drive).
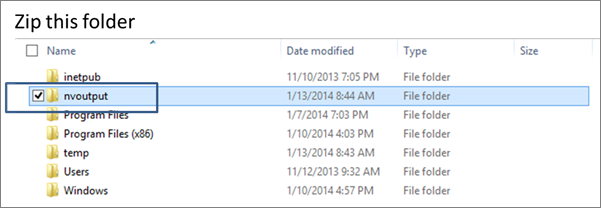
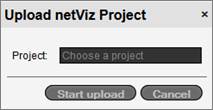
9) Log into the netTerrain server and press the netViz import button. Upload the ZIP file.
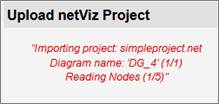
The import process will begin.
10) After the process completes you will be able to see the imported project.
This process takes about half a second per instance. If you want to check the number of objects in netViz before importing them, open netViz and select Summary->brief from the File menu.
You should also check the netviz.log file for errors (usually located in C:\ProgramData\Graphical Networks\netTerrain\vis\App_Data).
After the import is completed, a green generic node will be placed on the diagram where the import was launched. The node will have the name of the netViz project and the entire contents of the project will be placed underneath that node.
3.6 Using the netViz importer automated process
Log into netTerrain and press the “netViz import” button in the Import & Export ribbon. Upload a netViz project and wait for the project import to complete. Yeah, that’s it. The tricky part is to get IIS to work in concert with netViz access permissions, as described earlier in the chapter.

netViz import button
After the import is completed, a green generic node will be placed on the diagram where the import was launched. The node will have the name of the netViz project and the entire contents of the project will be placed underneath that node.
3.7 Bulk importing netViz projects
When needing to import numerous netViz projects, using the import button from the Import & Export ribbon may be inefficient and tedious. netTerrain allows for bulk imports of netViz projects but requires server file access to the webserver to upload netViz projects.
1) Ensure the following setting is present in the web.config file above ‘’
2) Add the netViz projects to the folder (or the custom installation folder):
3) From the netTerrain project click on to access the netViz queue. Make sure the number of netViz projects matches the number of projects uploaded. Click ‘Import’ to begin the process.

4) At the end of the import process, logs will be generated in the ‘App_Data’ folder. We recommend that you at least review the ‘[time-date] NV QUEUE Import’ log for any errors that may have occurred during import. There are also logs for each netViz project in the ‘App_Data’ folder.
Attention!
The value ’App_Data/netvizque’ is referring to a folder path. Make sure the folder ‘netvizque’ exists in the ‘App_Data’ folder.
3.8 Post netViz import checking
It is recommended to perform a basic sanity check in netTerrain to check that the netViz projects have been imported in a satisfactory manner. This includes comparing the catalogs, the projects and other miscellaneous checks.
3.8.1 Comparing catalogs
Perform a catalog node and link comparison between the netViz catalog and the imported netTerrain catalog.
One way to do this is to print the catalog from netViz (files/summary/catalog/print). Use this printout to check off each field and verify all fields have been imported. Make sure all visual overrides are available and check the drop-down lists. Currently, drop down lists need to be recreated in netTerrain. If any fields are missing, it is usually because the fields in netViz are repeated.
3.8.2 Comparing projects
As a second step, you can check the node counters for both netViz and netTerrain. In netTerrain, the counter for nodes will be displayed in the diagram properties of the netViz import node sub diagram.
netTerrain node counter
The netViz counter can be obtained by opening the netViz project and then going to Project->Summary. Compare both counters and if they are close enough then the import was successful. It is not uncommon to miss some nodes and links. This is usually due to extra system nodes added in netTerrain and/or dangling links not being imported.
3.8.3 Other checks
You can also:
1) Recreate any node and link field drop down lists that were not imported. Drop downs are not imported unless they are visual overrides in netViz.
2) Check visual overrides, to be sure they look correct.
3) Check link settings to be sure they have the appropriate color.
4) Check the nodes to see if any images need to be replaced.
5) Check background images for diagrams to see if any need to be replaced.
6) Clean up font sizes and positions for nodes and links. “Shape” object displayed fields should be set to the “center”.
3.9 Importing a netViz catalog
It is possible to just import a netViz catalog into netTerrain without importing any data:
1) Log into netTerrain.
2) Press the “netViz import” button under the Import & Export ribbon.
3) Create an empty netViz project that has a catalog collection that you want imported into the netTerrain nodes catalog.
4) Upload the netViz catalog project and wait for the project to be processed.
The node and link types from the netViz project should be imported as types in the netTerrain catalog.
4 Excel Import Guide
This chapter covers the process and techniques required for importing devices, nodes and other objects into the netTerrain project using the Excel bulk import spreadsheet.
The spreadsheet can be found in the web installation directory of netTerrain. The default directory is:
There should be a BulkImport.xls file in the base folder. This file must be used for the Excel import and should be copied and then modified. The file may be renamed.
Attention!
It is important that you maintain the existing format of the BulkImport.xls file and preserve its compatibility level; otherwise the Excel importer may not be able to comprehend its contents and will result in errors.
4.1 Bulk import worksheets
The bulk import spreadsheet contains four worksheets:
- NodeTypes: creates new node types in the catalog
- LinkTypes: creates new link types in the catalog
- Nodes: creates new nodes in the netTerrain project. Devices and cards are also allowed
- Links: creates new links in the netTerrain project
Attention!
You cannot generate catalog devices using the Excel spreadsheet. However, we support a large catalog of pre-modeled devices. If there are devices you would like to see modeled, please contact us at support@graphicalnetworks.com. As part of the maintenance we can model any types for you. Of course, our training and certifications also teach you how to do this in our device type modeler.
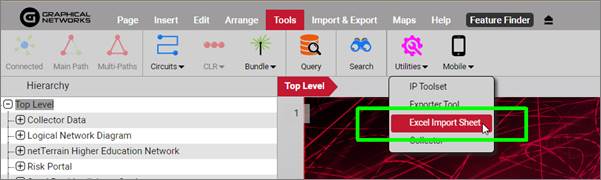
4.1.1 Obtaining the Excel import sheet
The Excel import sheet can be downloaded directly from netTerrain if the administrator has enabled downloads from the netTerrain page.
Simply log into netTerrain, go to the Tools ribbon, and click on the Tools menu option. If the Excel import sheet download has been enabled by the admin then you should be able to download the template excel import sheet directly.
Excel import sheet download
If the administrator disabled the direct download of the Excel template, you must request from the administrator directly.
If you are the administrator, the spreadsheet can be found in the web installation directory of netTerrain. The default directory is: C:\ProgramData\Graphical Networks\netTerrain\vis. There should be a BulkImport.xls file in the base folder. This file must be used for the Excel import and should be copied and then modified. The file may be renamed.
4.1.2 NodeTypes
To create new catalog node types, open the corresponding worksheet in the bulk import spreadsheet.

NodeTypes worksheet
The columns include:
- Name: This is the only mandatory field for creating a new Node Type and it represents the catalog node name
- iconImage: This field specifies the icon to be used when creating this node
- Field#: These are the property field names to be created for the node
Attention!
When specifying an icon image for the node type, you must zip together a ‘graphics’ folder, which contains the icon images, with the Excel spreadsheet.
4.1.3 Link Types
To create new catalog link types, open the respective worksheet.

LinkTypes worksheet
The columns include:
- Name: Catalog link type name. This field is mandatory.
-
linkColor: mandatory field that specifies the display color of the link, which can be a hex color code or a color name (note that not all color names are supported)
-
linkThickness: mandatory field that specifies the width in pixels of the link
- Field#: These are the custom property field names to be created for the link
4.1.4 Nodes
This worksheet is used for creating nodes and/or devices in the netTerrain project.

Nodes worksheet
The columns include:
-
Name: mandatory field that represents the name of the node
-
Type: mandatory field that identifies the type associated with the node. Once a type is defined, the custom fields in the spreadsheet will correspond to the custom fields associated with that node type in the netTerrain catalog
- ParentNode: the name of the parent node containing this node. If this field is blank, the new object will be placed on the ‘Top Level’ diagram.
- Field#: the custom fields associated with the type of the node. Each field in the spreadsheet has a sequential number prefix, which corresponds to the order of appearance of the custom field in the netTerrain catalog. For example, Field3 in the spreadsheet will populate the custom field that appears in order #3, for that type, in the netTerrain properties tab (not counting the id, name and type fields).
Making sense of the field numbering
4.1.4.1 Assigning cards to a device slots
Before assigning cards to devices through the bulk import process make sure the card types that you will use have been modeled and mapped to the device type and device’s modeled slots in the netTerrain catalog.
Let’s assume we have a device type called ‘deviceTypeName’ which has been modeled with slots named ‘S1’, ‘S2’, and ‘S3’. We now want to assign the card types ‘Card101’, ‘Card202’ and ‘Card303’ to ‘S1’, ‘S2’, and ‘S3’ respectively. We can accomplish this type of import by using angle brackets ‘>’.
The format for ‘ParentNode’ is as follows:
‘Project Object Name>Slot Name’

Example of card assignment
Attention!
Make sure the order of appearance of records in the spreadsheet follows the natural hierarchy associated with the objects. For example, if a card will be associated to a specific device, make sure the device was created first. A common mistake is referring to a parent node which has not yet been created. For example:

Incorrect import sequence
The first card, ‘MyCardName1’ will not be imported because ‘MyDevice’ has not yet been created.
4.1.5 Links
This worksheet is used for creating links in the netTerrain project.

Links worksheet
The columns include:
-
Name: mandatory field that represents the name of the link
-
Type: mandatory field that identifies the type associated with the link. Once a type is defined, the custom fields in the spreadsheet will correspond to the custom fields associated with that node type in the netTerrain catalog
-
Node1: mandatory field identifying the name of the starting node or device.
- Node2: mandatory field identifying the name of the ending node or device
- Field#: the custom fields associated with the type of the link. Each field in the spreadsheet has a sequential number prefix, which corresponds to the order of appearance of the custom field in the netTerrain catalog. For example, Field3 in the spreadsheet will populate the custom field that appears in order #3, for that type, in the netTerrain properties tab (not counting the id, name, type or endpoint fields).
4.1.5.1 Creating links between ports
Sometimes you need to create links between ports. This creates an additional naming convention challenge because ports are usually just named based on their sequential port number. Naturally, in such a case just using the port name to identify endpoints would be a problem since many ports with the same number might exist in the project.
To overcome this, you can identify ports by appending the device ancestry information in both the Node1 and the Node2 columns:
‘Device Name>Port Name’
For instance, let’s say we have a device called ‘myDeviceName’ with two ports ‘P1’ and ’P2’ and another one called ‘myOtherDevice’ also with two ports ‘P1’ and ’P2’
To link both ‘P1’ ports together and the ‘P2’ ports together we could format the Node1 and Node2 columns like indicated below:

Creating links between ports
In a similar fashion we can embed and concatenate card information in our endpoint columns, such as the example below:

Creating links between ports residing in cards
4.1.6 Troubleshooting and Tips
As you build your import spreadsheet, we recommend testing the import in phases to catch input mistakes early.
When errors occur on input, please refer to the ‘App_data’ in the netTerrain web directory folder. The log files are named as follows: ‘[date time] EI [name of uploaded spreadsheet]’.
Here are some common mistakes and their resolution:
4.1.6.1 Input string not in correct format issue:
Below is a typical logged error related to input string problems:
Input string was not in a correct format.
at System.Number.StringToNumber(String str, NumberStyles options, NumberBuffer& number, NumberFormatInfo info, Boolean parseDecimal)
at System.Number.ParseInt32(String s, NumberStyles style, NumberFormatInfo info)
at System.Convert.ToInt32(String value)
at NetTerrain.Importers.ExcelImporter.ExcelTypeToImportFormat(DataRow nodeTypeRow, String nodeTypeName)…
Usually this error stems from two possible data entry mistakes:
1) The Excel import spreadsheet had its structure (the columns) modified. This is most likely due to a change the compatibility level. You should make a new copy of the original bulk import spreadsheet and copy over the information.
2) Not all mandatory fields were filled out
4.1.6.2 Type image ignored
You may get the following error in the log:
Type image ignored. File does not exist.
Make sure that when you are importing node types, you zip together the spreadsheet with a folder called ‘graphics’, which contains all the referenced icons.
4.1.6.3 Parent node missing
You may get the following error in the log:
Cannot import node xyz as its parent node xyz cannot be found.
This one is self-explanatory and usually the resolution is simple. Make sure that the parent node exists or, if it is supposed to be imported during the same process, that it is higher up in the row sequence than the nodes that produce the error.
4.2 Proceeding to import from Excel
It is not uncommon for organizations to have more than once user to fill out data in Excel that should be imported into netTerrain. In many cases you could end up with several Import files waiting to be queued for netTerrain import. For that reason, netTerrain can import one file at a time or import a whole batch.
Excel bulk import options
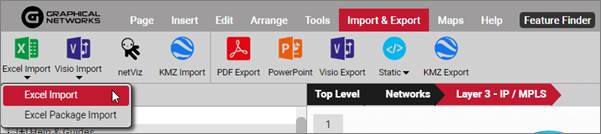
4.2.1 Importing single files
Once you have completed your bulk import spreadsheet, you can proceed to import the data into netTerrain one file at a time by pressing on the ‘Excel Import’ sub menu under the Excel Import menu option, as shown above.
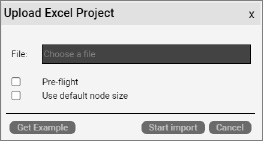
Single file import option
After prompted to choose a bulk import file from your local machine or connected network folders, you can fine-tune the import process with the ‘pre-flight’ and ‘Use default node size’ options.
The Pre-flight option previews the import before it actually happens. This gives you the ability to review and fix any issues with the data being imported, before it is committed. Additionally, if you want to override any node sizes with the default node size defined in the catalog, make sure you check the ‘Use default node size’ checkbox.
Once you are ready, click on the ‘Start import’ button to start the process.
4.2.2 Importing a package
The ‘Import package’ option is quite self-explanatory and prompts the user to choose multiple Excel files and import them as a package.
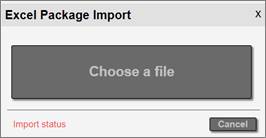
Package file import option
After clicking on the ‘Choose a file’, you are prompted to pick one or more Excel files. Remember that these files need to be formatted based on the base BulkImport file standard. After selecting the list of files, a dialog showing each individual file, with the status ‘Ready for upload’ will be displayed.
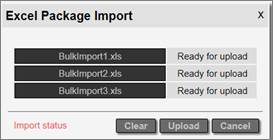
File upload dialog
This list can be cleared, if you want to start over. Once you are ready, press the ‘Upload’ button to get the process started. And get yourself a big cup of coffee, as this can take a while.
It is also recommended to do this type of process involving large files during the night, or when users are not actively on netTerrain because it can slow the server down considerably.
Users can access the Import status list, by clicking on the Import status link as shown above. This will display a list of the files in the queue. The status column will show files that are still queued up as ‘New’, files currently processed as ‘In process’, the ones that are completed as ‘Done” and any files that errored with the label ‘Error”.
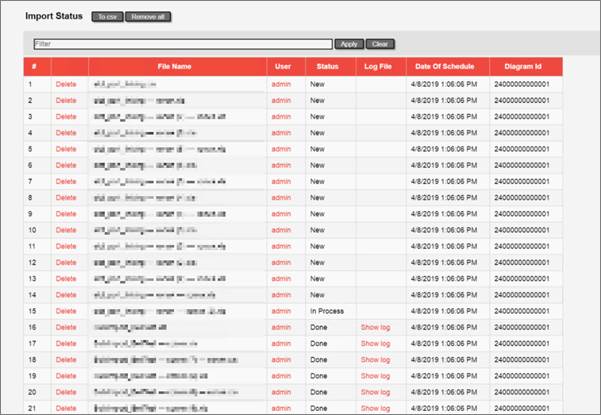
Excel package queue list
Logs for individual files already processed can also be accessed by clicking on the ‘Show log’ link.
An administrator can remove any pending files from the queue. A non-admin user can remove their own files from the queue.
5 KML and KMZ files
KML and its cousin, KMZ (zipped KML) are typical formats used by mapping or GIS applications, such as Google Earth, and they can be easily imported into netTerrain. netTerrain can also export an OSM-based diagram (a netTerrain diagram that has an Open Street Map reference) to KML. KML/KMZ imports and exports are used in the context of a netTerrain OSP project, specifically to import data that exists in another OSP type application and minimize manual data entry.
Nothing needs to be setup on the netTerrain server or on the client side to make the import and export work but note that these features only work for netTerrain diagrams containing a dynamic map. Dynamic maps are only available with a valid netTerrain OSP license.
5.1 Importing from KML
Before importing a KML file, users need to be aware of certain basic considerations and requirements, such as which diagrams are valid for imports, as well as the characteristics of the map to be used.
5.1.1 Prerequisites for importing KML / KMZ files
As stated, a KMZ file is basically a compressed version of a KML file, but there is, however, an important distinction to make: KMZ files can contain images, typically located under a “files” folder. These images would not be present in the KML file since the latter is essentially a text file with a special XML style format.
netTerrain can use images contained in the KMZ file and associate them with the corresponding nodes that are imported. If you want to preserve the same icons used in your application that exported the data, you may want to utilize the raw KMZ format instead of the unzipped KML file and make sure that those images are indeed included. From now, we will mostly just refer to KMZ files, when explaining this feature.
Before importing a KMZ file into netTerrain, make sure that you are on a diagram in netTerrain that already has a dynamic map in it.
This map should ideally be large enough to correctly place all nodes that exist in the KMZ file. This means that every latitude and longitude coordinate associated with a node in the file should be contained within the boundaries of your netTerrain map, otherwise, any nodes falling outside of the boundaries will be discarded. Since importing the data is easy, if your original map is not correct, you can delete the imported data, change the map, and retry. Also, it is better to err on the side of a larger than needed map. You can change it to a smaller map later, and netTerrain will preserve the coordinates (if they are still within the boundaries of the smaller map).
Note
Since KMZ data is flat in nature, netTerrain will not produce any hierarchy of any kind. As such, all the data will be placed in one diagram, which in some cases may produce a very large diagram that takes a long time to load.
5.1.2 Importing a KMZ/KML file
To import a KMZ file navigate to the diagram that contains the map that will hold the KMZ data and click on the import from KMZ button found under the Import & Export ribbon.

KMZ import button
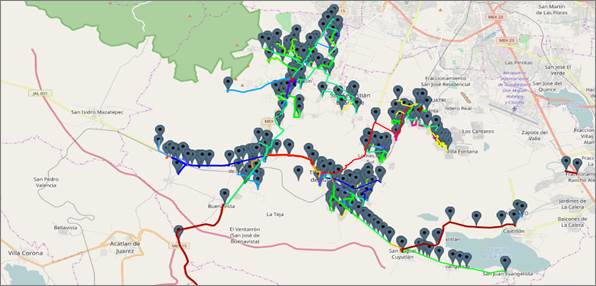
In the upload KML / KMZ file dialog navigate to the folder that has the KMZ file and click on ‘Start Upload’. Once the import finished, an “Import completed” dialog appears. After you click on ‘Ok’ the map is refreshed, containing the KMZ data.

Sample KMZ import into netTerrain
5.2 Exporting to KMZ
Exporting a netTerrain diagram to KMZ is a very straightforward task.
First, navigate to the netTerrain diagram that contains the data to export. Remember, it must be a diagram that contains an OSM map.
Then click on the Import & Export ribbon and click on the KMZ Export button on the right.

KMZ export button
In the upload KML / KMZ file dialog navigate to the folder that has the KMZ file and click on ‘Start Upload’. Once the import finished, an “Import completed” dialog appears. After you click on ‘Ok’ the map is refreshed, containing the KMZ data.
Sample KMZ import into netTerrain
A few things to note about the results you see after the import:
-
Nodes are automatically assigned a type
-
The same icon you used in Google Earth (or your original tool) should be seen in netTerrain
-
Lat long positioning is, as expected, automated
-
Lines should include bend points to follow the same path you used in the source
-
Line colors should be preserved
-
“Dangling” links are not supported, as such, netTerrain creates fictitious, transparent endpoints to represent these lines